No products in the cart.
A dripping tap is a very common problem in many UK homes. You might hear that annoying “drip-drip” sound while you are trying to sleep. Furthermore, a single leaking tap can waste over five thousand litres of water every year. This waste will eventually lead to much higher water bills for your family. However, you do not need to worry about the high cost of a plumber. Learning how to fix a leaking tap in the kitchen is actually quite simple.
Most people can finish this DIY task in less than one hour. This guide will help you understand your plumbing systems better than before. We will explain everything using very easy English for our new UK residents. You will soon feel like a professional handyman in your own lovely home.
Let us begin by looking at why your kitchen tap is currently dripping.
How to Identify the Problem?
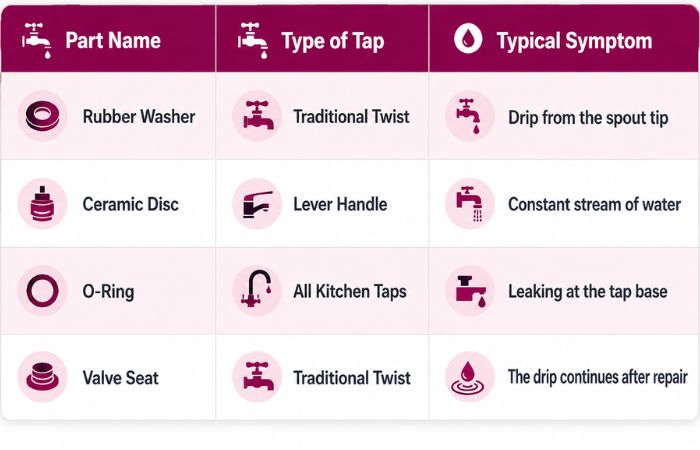
Before you start, you must understand why the water is escaping. Most kitchen taps leak because a small internal part has finally worn out. Inside traditional taps, there is a small rubber ring called a washer. Over time, this rubber becomes hard or develops tiny cracks in it. Thus, the water can squeeze through the gaps even when the tap is off.
Another common issue involves the O-ring, which is a larger rubber seal. If water leaks from the base of the spout, the O-ring is likely broken. Modern UK homes often use stylish lever taps instead of traditional turning handles. These modern taps use ceramic discs rather than old-fashioned rubber washers. If these discs get scratched by limescale, the tap will start to drip.
Furthermore, the valve seat might become corroded after many years of heavy use. This corrosion prevents the washer from making a perfect seal against the metal. Knowing which part is broken helps you buy the correct replacement at the shop.
Common Tap Issues in the UK
What Tools Do I Need to Get Started?
You only need a few basic tools to complete this simple repair. Most of these items are available at local shops like B&Q or Homebase. Initially, you will need a good adjustable spanner to loosen the metal nuts. A crosshead and a flathead screwdriver are also very important for removing covers. You should also buy some replacement washers or a new ceramic cartridge.
Make sure you bring the old parts to the shop to find a match. Furthermore, PTFE tape is very helpful for creating a waterproof seal on threads. A small piece of soft cloth can protect your shiny chrome finish from scratches. Finally, having a torch will help you see inside the dark kitchen cupboard.
How do I Prepare My Plumbing to Fix a Leaking Tap?
Safety is the most important part of any home DIY plumbing project. You must turn off the water supply before you touch any metal parts. Otherwise, you might flood your kitchen floors with a huge fountain of water. Initially, look under your kitchen sink for the small blue or silver valves.
These are called isolation valves and they control water for that specific tap. Turn the small screw on the valve until it is horizontal. If you cannot find these, you must find the main internal stopcock. This is usually located under the sink or in the hallway cupboard. Turn the handle clockwise as far as it will go to stop flow.
Next you must drain the water that is already inside the pipes. Open the kitchen tap fully and wait for the water to stop flowing. This step ensures that no pressure remains inside the tap body itself. Moreover you should always place the plug into the sink drain hole. This prevents small screws or washers from falling down into the waste pipe.
Losing a tiny screw can turn a simple job into a nightmare. Lay a towel down on the counter to keep your work area tidy. Now, you are ready to take the tap apart with your tools. Your preparation will make the rest of the job go very smoothly today.
How do I Fix a Traditional Compression Tap?
Traditional taps are the ones you turn several times to start the water. To begin, you must remove the decorative cap on top of the handle. Sometimes this cap says “hot” or “cold” on the plastic or metal. Use a thin flat-head screwdriver to gently pry the cap off the tap. Underneath, you will find a small screw holding the handle in place. Unscrew this carefully and pull the handle upwards to remove it from the stem. Now, you will see the brass heart of the tap called the headwork.
Use your adjustable spanner to grip the large nut on the brass headwork. Turn it anti-clockwise until the entire metal part comes out of the tap. Look at the bottom of this part to find the rubber washer. It is usually held in place by a very small metal nut. Remove the old, squashed washer and replace it with a brand-new one. Ensure the new washer is the exact same size as the old one. Finally, put the brass headwork back into the tap and tighten it. Replace the handle and the decorative cap to finish the easy repair.
How Do I Fix a Modern Ceramic Disc Tap?
Many modern UK kitchens have taps that only move a quarter turn. These do not have rubber washers but use a plastic or brass cartridge. First, look for a tiny “grub screw” hidden under a small plastic cap. This cap is often found at the back or bottom of the handle.
Use an Allen key or a screwdriver to loosen this hidden metal screw. Once loose, you can pull the lever handle off the main tap body. You will now see the top of the ceramic disc cartridge.
Use your spanner to unscrew the large brass nut holding the cartridge down. Carefully pull the cartridge out and check it for any obvious white limescale. Sometimes, simply cleaning the dirt off the ceramic discs can stop the leak. However, it is usually better to just buy a whole new cartridge.
Take the old one to the hardware store to ensure it matches perfectly. UK cartridges come in many different lengths and widths for different tap brands. Slide the new cartridge into the tap and line up the small notches. Tighten the nut firmly but do not use too much force during installation.
What Mistakes Should You Avoid When Fixing a Leaking Tap?
Many people make simple errors when they try to fix their plumbing issues. One big mistake is overtightening the nuts when you put the tap back. If you pull too hard, you can crack the new rubber washer.
This will actually cause a brand-new leak to start almost immediately. Furthermore, you might strip the metal threads on the expensive tap body. Just tighten the parts until they feel firm and do not move. You can always tighten them a bit more later if you see drips.
Another common mistake is buying the wrong size of replacement parts for your tap. UK plumbing uses both metric millimetres and old imperial inches for different tap types. A washer that is just one millimetre too small will not work correctly. Always take your old parts with you when you visit the DIY shop.
Additionally, many people forget to clean the valve seat inside the tap body. If there is grit or limescale there, the new washer cannot seal properly. Use an old toothbrush or a piece of sandpaper to clean the metal. Finally, always remember to turn the water back on very slowly at first. This prevents a “water hammer” shock from damaging your household pipes or joints.
When Is DIY No Longer Enough?
DIY is great for saving money, but some jobs are too difficult. If you see water leaking from inside the wall, stop your work immediately. This could mean a pipe has corroded or a joint has finally snapped.
Furthermore, if the tap body is cracked, you must replace the whole unit. Changing an entire kitchen tap can be tricky for a beginner to do. You might also struggle if the nuts are completely rusted and will not move.
A professional plumber has special tools like basin wrenches to reach difficult spots. If you feel overwhelmed or scared, there is no shame in calling for help. Local UK plumbers are usually very friendly and can fix problems very quickly.
How Can You Maintain Taps in UK Homes?
Keeping your taps clean is the best way to prevent future leaking issues. The UK has many areas with “hard water”, which contains a lot of minerals. These minerals turn into white, crusty limescale that destroys your rubber tap washers. You should clean your taps once a week with a mild vinegar solution. This helps dissolve the limescale before it can enter the internal tap valves. Moreover, avoid turning your taps off with too much physical force every day. If you squeeze the handle too hard, you crush the delicate rubber seal. A gentle touch will help your washers last for many more years.
- Clean the spout aerator every six months to maintain good flow.
- Check the cupboards under the sink for signs of dampness or mould.
- Replace washers every few years even if they are not leaking yet.
- Apply a little silicone grease to the O-rings during your yearly maintenance.
Conclusion on Fix a Leaking Tap
Taking the time to fix a drip will bring great satisfaction to you. Not only is the annoying sound gone, but your home is more efficient. You will notice a nice reduction in your monthly UK water meter bills.
Furthermore, you have gained the confidence to handle other small repairs around the house. DIY skills are very valuable for anyone living in a new country today. Remember to always keep your basic toolkit in a safe and dry place.
Share your new knowledge with friends or neighbours who might have leaky taps. A little bit of work goes a long way in keeping a home happy. Enjoy your quiet drip-free kitchen and the money you have saved this week!
Frequently Asked Questions (FAQs)
1. How do I stop my kitchen tap from dripping?
- Turn off the water supply, remove the tap handle, replace the worn washer or cartridge, then reassemble tightly.
2. Can I fix a leaking tap myself?
- Most dripping taps can be fixed at home with basic tools and replacement parts in under an hour.
3. Why is my kitchen tap dripping when the water is off?
- Usually because a worn washer, damaged O-ring, or faulty ceramic cartridge is no longer sealing properly.
4. How do I stop my kitchen faucet from dripping?
- Identify the faulty part, replace it, and make sure all fittings are properly tightened.
5. Do you need a plumber to fix a dripping tap?
- DIY is fine for simple washer or cartridge replacements, but call a plumber if parts are stuck or pipes are leaking.
6. What are the common causes of dripping taps?
- Worn washers, damaged ceramic discs, limescale build-up, loose fittings, or corroded valve seats.
7. How much will a plumber charge to fix a dripping tap?
- In the UK it usually costs around £50–£150 depending on the plumber and complexity of the repair.